Showing posts with label scallop. Show all posts

Wednesday, March 23, 2011

lace scallop for pineapple doily - part 4

The scallop is getting larger. So, it's time to replace the ch 5's with ch 6's:

Sixth row:
Turn. Skip 1st ch-5 space. * ch 6, sc 1 in next ch-5 sp* 12 times. ch 6. sc 1 in next ch-5 sp.

pineapple doily scallop, in progress

If this the last scallop, replace the last "sc 1" of row 6 with "join to sc from first scallop". The pic shows the first and last scallop being joined -- with a slip stitch.

Tuesday, March 22, 2011

lace scallop for pineapple doily - part 3

The next few rows are all the same:

Third row:
Turn. Skip 1st ch-5 space. * ch 5, sc 1 in next ch-5 sp* 12 times. ch 5. sc 1 in next ch-5 sp.

pineapple doily scallop, in progress

Fourth and fifth rows:
Turn. Skip 1st ch-5 space. * ch 5, sc 1 in next ch-5 sp* 12 times. ch 5. sc 1 in next ch-5 sp.

pineapple doily scallop, in progress

pineapple doily scallop, in progress

If this had been any scallop except for the first one, replace the last "sc 1" of row 5 with "join to sc from previous scallop".

Row 6 in the next post.

Monday, March 21, 2011

lace scallop for pineapple doily - part 2

The second row of the scallop is worked on the wrong side. Before starting the row, you might want to weave in the loose end. It's easier to weave in now than later.

Second row of the scallop:
Turn. Skip 1st ch-1 space. * ch 5, sc 1 in next ch-1 sp* 12 times. ch 5. sc 1 in next ch-5 sp.

The ch-5 sp is the one next to the ch-5 sp holding the first sc of Row 1.

Then, it's time to count. There is a ch-5 sp at the beginning of the row and another at the end. In between are 11 ch-5 spaces that look almost like picots. The pic shows the scallop after row 2. (I often chain a few stitches before putting crochet up for a while. Then, I rip them out when ready to start crocheting again.)

Rows 3, 4, and 5 will be in the next post.

Thursday, March 17, 2011

lace scallop for pineapple doily - part 1

I hadn't crocheted lace doilies for ages -- until this month's NerdWars on Ravelry. One of the challenges was to finish a project started by someone else.

I chose my MIL -- who passed away almost 2 decades ago -- and left me with yarn, crochet thread, steel crochet hooks, and booklets.

For the NerdWars challenge, I picked a pineapple pattern doily from one of her books. I used her crochet thread (size 30) and a size 10 (1.5mm) steel crochet hook.

The inner rows of the doily aren't anything special...

But, the scalloped edging is. It transforms what otherwise would be just a plain doily into something exciting.

The last of the inner rows is: * 1 sc in center of ch-3 sp, ch 5 * around. Join.

In order to start the first scallop without the need to fasten off the thread, I ended the row by replacing the last ch 5 with "ch 3, dc in first sc of round".

The first pic show this last "ch-5 sp" plus the beginning of the scallop, a sc into the chain space:

pineapple lace doily

First row of the scallop:
sc in ch-5 sp, * ch 1, dc 1 * 12 times in next ch-5 sp, ch 1, sc 1 in next ch-5 sp, ch 5, sc 1 in next ch-5 sp.

This forms a basic scallop -- plus something extra: ch 5, sc 1. These sts form the beginning of the lace part of the scallop. The second pic shows the entire row plus part of a finished scallop.

pineapple lace doily

Note:
Many scallop patterns would have this basic scallop (or a similar one) repeated around the edge:
sc in ch-5 sp, * ch 1, dc 1 * 12 times in next ch-5 sp, ch 1. Repeat to end (starting with a sc in next ch-5 sp). Join to first sc of row.

This pattern doesn't. Each scallop is worked separately. The second row of the scallop is detailed in the next post.

Thursday, July 15, 2010

a daylily - Part 3

In the previous post, we crocheted the front 3 petals. Now, it's time for the final 3 petals.

Rnd 3 (back petals). * Sc in next Rnd-1 ch-3 sp (crocheting behind Rnd-2 petal), ch 1, sc in next Rnd-1 ch-3 sp (crocheting behind same petal), (ch 1, dc 1 ) 3x in Rnd-2 ch-1 sp, ch 6, sk 1 ch st, sc 1, dc 3, tr 1, (dc 1, ch 1 ) 3x in same ch-1 sp, repeat from * 2 more times (3 petals). Join to 1st sc of rnd.

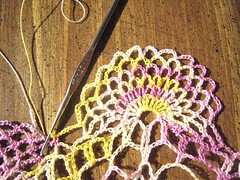
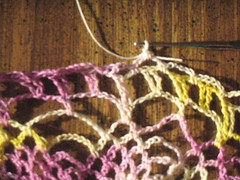
I think the easiest way to "sc in next Rnd-1 ch-3 sp" is to turn the daylily over. The first picture shows the first sc of the round in progress -- preparing to draw a loop through the ch-3 sp.

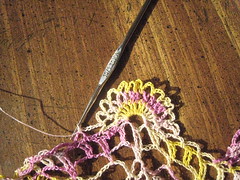
Then, keep the daylily turned over. "Chain 1 and then sc 1 in the next ch-3 sp". The next ch sp is in a clockwise direction from the previous one -- since we're working on the wrong side of the daylily.

This completes: "Sc in next Rnd-1 ch-3 sp (crocheting behind Rnd-2 petal), ch 1, sc in next Rnd-1 ch-3 sp (crocheting behind same petal)"

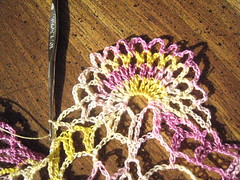
For the petal itself, turn the daylily so the right side is facing and start working in a counterclockwise direction again.

The petal is worked almost the same way petals from the previous round were.

To make matters easier, you'll be starting the scallop part of the petal by crocheting into a ch-1 sp from the second round (instead of crocheting into a dc from the first round).

"(ch 1, dc 1 ) 3x in Rnd-2 ch-1 sp" is the first half of the scallop.

"sk 1 ch st, sc 1, dc 3, tr 1" is the top part of the petal.

Finally, "(dc 1, ch 1 ) 3x in same ch-1 sp" completes the petal.

Then, it's time to turn the flower over and start again.

After the third petal, all that remains is to:

"Join to 1st sc of rnd."

and then:

"Fasten off and weave in loose ends."

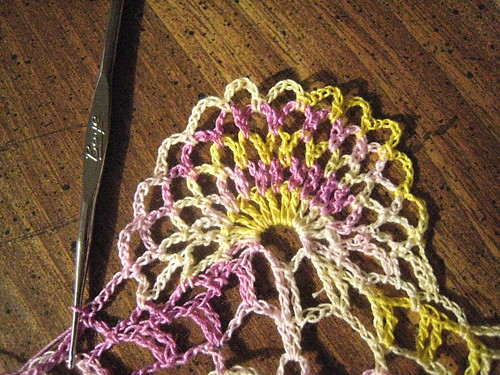
The last picture shows the flower from the wrong side just before fastening off.

Wednesday, July 14, 2010

a daylily - Part 2

In the last post, we worked the first round of the pattern. The next round of the daylily pattern is much more complicated than the first:

Rnd 2 (front petals): * Sc in next Rnd-1 ch-3 sp, (ch 1, dc 1 ) 3x in next dc, ch 6, sk 1 ch st, sc 1, dc 3, tr 1, (dc 1, ch 1 ) 3x in same dc, sc in next Rnd-1 ch-3 sp, ch 1, repeat from * 2 more times (3 petals). Join to 1st sc of rnd.

This round begins at the lower right hand corner. It starts out with a sc in one of the ch-3 spaces from the previous round.

The next few stitches are the beginnings of a scallop. Chain once, then double crochet into the top of the next dc from the previous round. Chain again, then double crochet into the same dc. Finally, chain once more and double crochet into the same dc.

Then, we abandon the scallop to create a top for the petal. (This part is a lot like that of the coneflower in a previous post.)

"ch 6" takes one to the top of the top of the petal. Then "sk 1 ch st, sc 1, dc 3, tr 1" -- or, in other words, skip 1 chain stitch - the last chain stitch -, then single crochet into the next chain stitch, double crochet into each of the next 3 chain stitches, and finally triple crochet into the final chain stitch -- to arrive at the base of the top of the petal.

The last few stitches form the end of a scallop.
-- And the first petal is complete.

Two more petals finish off the round. And, we have something that looks a lot like a Triforce (Zelda ref) or trefoil.

In the next post, we'll work the last 3 petals for the flower.